

I have been fascinated with food ever since I was a kid. I normally take photos of food before I eat it. Sometimes, it makes my mom angry because food is meant to be eaten, not photographed. But I'm thankful I did because now, it became my profession as an advertising photographer. I am very lucky to be sponsored by our company to attend this really nice food photography workshop handled by veteran advertising photographer Mark Floro. He is considered the best in the food photography business. Workshop was held at Philippine Center for Creative Imaging in Makati.

It's a 2 Day workshop and almost 70% of the class is all hands-on. It's nice because learn faster when I apply what I'm learning. I learned how to use different kinds of lighting : (1) Softbox - my 2nd favorite kind of light. I use this more often in the studio and on location. (2) Diffusion - kind of lighting where you use something to diffuse the source of light such as diffusers, umbrellas, or even acrylic glass. (3) Hardlight - It's difficult to master. But once you get the hang of it, you can get nice highlights and shadows in your photos. Lastly (4) Window light or Natural light. My favorite! Why? Its natural, and it doesn't require electricity. Its everywhere and easy to diffuse and reflected. Harness it properly and you will be rewarded with soft, smooth and well lit images.

I shot this with a very unique setup. First time to do this. It's a makeshift spotlight (the ones you put on ceilings) diffused with a huge acrylic glass. I asked myself, what the hell is that?! From afar without the light on, i wondered why is the light being blocked? I never knew that material was translucent. I thought it was a piece of board or something. When the spotlight is on, the result is a really soft, controlled light depending on the distance of the bulb to your acrylic board. If you move the spotlight further, light becomes weaker and softer... when you move it closer, hard light is created. Out comes deeper and stronger shadows. It's a good set-up but very bulky.

One of the best things I learned from the workshop is the basics in food styling. Professional food stylist Tonette Asprer showed us how to properly style a porkchop. You got to have good art skills doing this because you literally have to paint your food. In pictures, it has to look super delicious but in reality, the food is uncook and basically not safe to eat. Sir Mark said that there are three things on how to make food look good in photographs : (1) Hire a food stylist (2) Hire a FOOD STYLIST and (3) MARRY a food stylist! Mark Floro's wife is one of the best food stylist in the country and they work as a team. :)

Food stylists are like make-up artists, they make the model look fabulous! In this case our model is a Porkchop. I used a softbox for this shot. Mark floro taught us to use continuous lighting because it's easier to control the highlights and the shadows. You can also work in live view. When the camera is connected to the computer, (tethered), you get the photo that you want with a press of a button. Framing,conceptualizing and composing your shot is way too easy.

Ms. Tonette showed us how to food style ice cream. This is the real money maker she said. Ice cream is very hard to shoot for the simple reason ice cream melts really fast! Unless you shoot it inside a freezer. With FAKE ice cream, you'l never go bad no matter what. Ms. tonette showed us her secret ice cream dough that looks like clay dough. When you scoop it out with an ice cream scooper, it looks so real!


It's my turn to use the hard light set-up. Same spotlight like before but this time its nothing goes between the lightsource and the food. It's challenging but once you know how to control it, you will get really nice highlights and shadows. Photo on top is the chicken using hard light. Lightsource is coming from the leftside and then reflected on the right with a makeshift cardboard reflector ( reflective gift-wrapping foil + foamboard ). I also used some feathers mounted on an empty spray can using blu-tac. Take note : the feather that I used came from a Philippine Eagle!!!! Yeah it's crazy. Feather is quite big! :) What are the feathers for? Used it as a flag(to block light) to deliberately generate soft, creative shadows onto your food. :)

On to my next favorite light is the window light. I use this more often. There's something about natural light that enlightens me. It's really nice when diffused and reflected. Besides you dont have to carry lighting gear. All you need is a piece of cardboard as reflector. On this photo, i used a diffuser at the back of my fake ice cream and then placed my makeshift cardboard reflector at the front.

Tried the same set-up with this salad. The lettuce from the salad is translucent and it made the green color stand out! I love this photo! I originally shot it with all the white space on top in provision for a header text.

This is usually my usual angle. Back lit , (or side lit) then reflected by a cardboard on the opposite side. I just love this technique because it's so simple yet it creates beautiful highlights and shadows that shows the texture of the food.

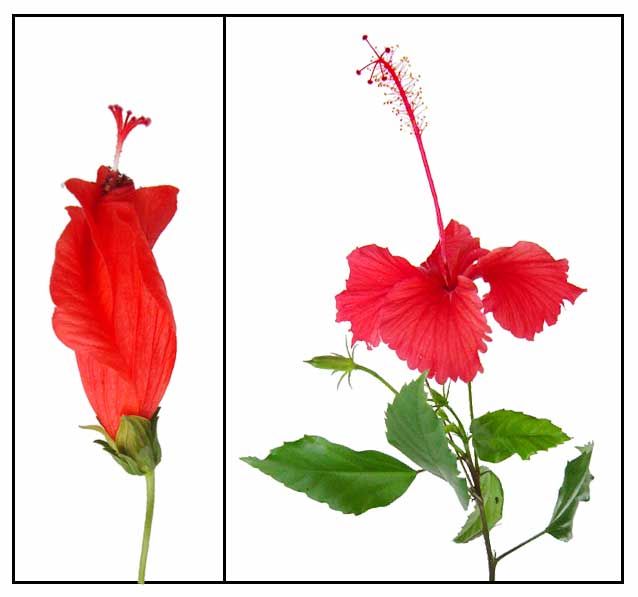
2nd day of workshop, Sir Mark told us to use our favorite lighting set-up and try to shoot all the food prepared for us. I chose the setup that i use more often - the Softbox. I played with the spaghetti. Asked for Ate H (Ms. Tonette's assistant) for some uncooked pasta and some raw ingredients like tomatoes, red bell peppers.. onions... for my back drop. The stem on that tomato is too damn perfect because thats a gumamela flower stem! Originally its all withered, blackened and ugly. Took out a the gumamela stem then glued it on the tomato using mighty bond! Voila! Picture perfect tomato stem! One of the magic tricks i learned that day. Pretty neat huh?

Next up is the ensaymada. I really love ensaymada and i love it with coffee. Grabbed a cup and placed it beside the ensaymada using a gold fabric. Then i sprinkled coffeebeans all over to add that "effect" that i don't know what is it but it looks good. The best thing about this photo is that, Sir Marked liked it :) I had another shot but with a teaspoon on the side. He told me, sometimes you just have to remove the unnecessary elements into your frame to make it more appealing. It's important to point the attention of the viewer on to the food, not on anything else. The food is always the hero. Not the spoon, fork or your china..

One of my classmates from Dubai, (who happens to be a policeman, like CSI kind of policeman!) saw my Lumix LX5. I normally use it as my back up camera and shooting behind the scenes. He asked me what is this camera and i showed him what it does. I boasted out its amazing macro features and took this image for him. He was surprised! The Lumix LX5 is really good camera for a very reasonable price (i think now its selling less than 10,000 php)! What makes this good is the Leica glass that creates sharp and vivid photos.

This is the last part of the workshop... learning how to shoot splashes, flowing water, steam, and flames! The workshop staff already prepared the necessary lighting for this exercise. First up is the splash technique which is kinda messy. My partner, dropped a piece of onion onto a bowl of water and I photographed it. Timing is everything!

1/125 | f/13 | ISO200 | AWB

For steam or smoke, light should come from the rear left side and then flagged (blocked) by a piece of cardboard to prevent glare from the lens. Camera setting :
1/125 | f/8 | ISO200 | AWB

Now this one is the coolest part of the workshop. Learning how to shoot flames! I love flames! specially on grilled burgers, hotdogs, BBQS! Again light should be at the back and shot really dark. Make sure your environment is safe and controlled to shoot flames. You dont wanna start a fire or something. Anyway, here's the camera setting for these photos :
1/15 | f/5.6 | ISO 1200 | Sunny or Tungsten set WB to 10000K, 5000K or 2500K
Here are a few key notes from the Workshop :
- Be very gentle with chefs. Appreciate their food very well.
- In food styling, food must LOOK good . Not taste good.
- "Tulo Laway Factor"
- Do not "oversell" your food photo.
- When you shoot rice perfectly, everything goes well.
- STRONG VISUAL impact
- Charge more if you do action shots
- Use props!
- In food styling : First - Do feasibility meeting - concept, ideas, sketches, drawings Second : Pre production Meeting - the details. what plate to use, what kind of color the placemats are.. etc Third is the Photoshoot itself.
Basic Food Styling Tools :
- Tweezers
- Spray Bottles
- Small Brushes
- Glycerine
- Cleaning Supplies (Cotton swabs, paper towels)
- Pins (T-Pins specifically)
- Scissors
- Knives (Bread, Paring, Slicer)
- Bamboo Skewers , Toothpicks
- Mighty Bond
- Pen Torch
- Cosmetic Sponge
- Squeeze Bottle for sauces

I learned a lot! Many thanks to Ensogo for sponsoring me to go to this workshop. I really wanted to attend this but its kinda pricey and just settled for you tube tutorials in food photography and food styling. It's an honor to be here. I really wanted to pursue a career in advertising photography someday and I believe this is one of the ways. I wanna thank Sir Mark Floro for showing us his brilliance in his craft. Salamat sir! Thank you for all the inputs! I also want to thank Ms. Tonette and her staff for showing us the basics in food styling. I actually want to learn more! Food styling is art! It teaches you discipline and patience. Also to my classmates from the workshop. You guys are awesome!I had fun. If you want to attend workshops at PCCI, you might want to check out their website at www.pcci.com.ph .


